Die-cut Decals: The Breakdown
Posted by CM Spaans on Jul 18, 2014
Hello all! I would like to address a question for some of our customers out there. We've had quite a few people asking us to do one color, say black, with a white background. And then I have to email them back, and say that there really isn't a background color at all, but that our decals are die-cut. They still seem a little confused. I would like to clarify that for them.
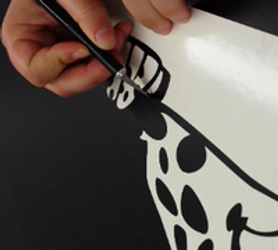
Some cheaper wall decal companies actually print their designs, as opposed to cutting them like we do. The printing is done on a large piece of plastic so hence, there is a background. But when we CUT the decal, you end up with a quality product that is ONLY the decal. All excess material is weeded out.
Below is a picture of the cut lines. The top right of the image already has some excess material weeded out so you can see the design showing up. The bottom left part of the image shows you the cut lines that our machine made.

Weed. I know it's funny word when talking about vinyl decals. What I mean by "weed" is that we have to take the excess vinyl off, so that just the decal is left.

The die-cut decal comes to you sandwiched between two layers. The bottom layer is the backing, the middle is the wall decal and the top layer is the transfer tape.


You can see the die-cut decal above adhered to the transfer tape. Both the backing and the transfer tape layers are discarded after the application is complete. The transfer tape is the "tool" that helps the design stay exactly aligned and in one piece. The design itself is not actually one piece - all the letters or words are actually separate pieces of the design.
And there you have it. It's a fairly simple thing and we know you will see what we mean when you apply your first die-cut decal! :) Hopefully this helps to make more sense of what we mean when we say a "die-cut" decal!
Hope you have a wonderful weekend!
~Cassie
P.S. Here's a video of the weeding process!

